Pin It button on image hover

Monday 31 December 2018

A New Year Wish (by Judith)

Hello everyone, it is hard to believe that another year has passed. I hope that you have all enjoyed a wonderful Christmas, and are looking forward to 2019 with optimism and hopes for a year full of promise. Some of you will not have had people to share Christmas with, or may have missed loved ones. You may not be feeling that the New Year brings much joy, or anything to look forward to. We hope that you can feel part of our community, and know that we are always here to share your crafting experiences, and offer friendship through the blog and our Facebook Group. We also have a Ning Group where you can make friends with other Chocolate Baroque fans, and chat and exchange tips and ask questions. If you sign up for the weekly newsletter from Chocolate Baroque, the links for all of these places are included within the newsletter.

Personally, I have had a mixed year, but I always feel that a new year offers the possibility to try new crafting challenges, and to learn new skills. I always want to be able to do something else! My craft room is bulging as it is, but there is room for more, and I love to experiment with colour and texture. My two projects that I am sharing with you today are both very cheery, and will hopefully chase away the Winter blues. The first one is a scrapbook page that I made as a TV demo for the Hochanda shows last month, featuring Lesley's Designer Papers 8" x 8" - My Floral Soul, and the Movie Strip Collage stamp.

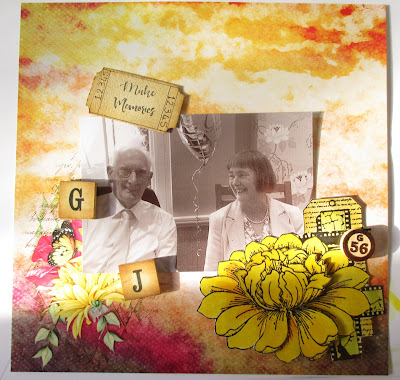
I started the project by stamping a fern from the Wild Meadow stamp set onto the background. I added a sepia photograph of my parents, celebrating their golden Wedding Anniversary. I changed the photo to a sepia effect, because I wanted to use it for a different occasion. I stamped the flower image onto a spare piece of card a couple of times, and coloured it using Koh-I-Noor paints. I decoupaged the image, and added it to the page. I made my own ticket, and stamped a sentiment from the Shared Beauty stamp set onto the centre. I added brown ink onto a couple of scrabble tiles, which are my Mum and Dad's initials and a bingo piece, to represent the number of years they have now been married, and also added those to the background.

These papers are lovely for scrapbook pages, they are the perfect size, and are great to add a bit of stamped detail if you wish. I added a piece of kraft card behind mine for extra stiffness.

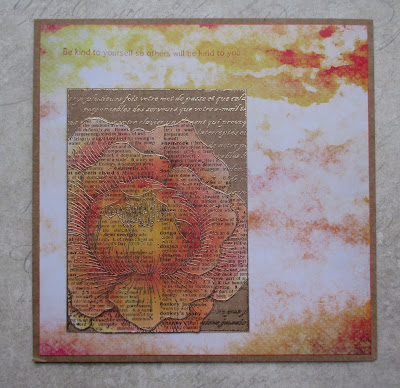
My second project uses the same background paper , but in the plain version, to make a pretty card. I stamped the Be Kind image onto some book paper a couple of times, using Versamark and gold embossing powder. I added three different colours of Distress Ink for shading. I also stamped and embossed the image onto a piece of kraft card, and added the book page flower layers onto the kraft card script layer. I then adhered this panel to the decorative paper. I stamped the sentiment onto the background with a deep orange ink, which I then used to edge the paper. A kraft card mat finishes the card.

Thank you for your support in 2018, your visits to the blog, and your kind comments. Have a wonderful New Year, and we look forward to your visits in 2019.

Take care and best wishes,

xxx

Sunday 30 December 2018

Two Ways To Be Kind (by Julie)

Hello, I hope you are all preparing to get your new year underway in style and surely there is no better way than to Be  Kind. This is the name of the lovely floral stamp I have used in both of my cards today.


For my first card I have teamed the stamped image with My Floral Soul designer papers.
I stamped and embossed the Be Kind image onto one of the designer papers and then cut around the edge of the petals with a craft knife. You just need to cut enough of the petal so that it stands out from the main image and not cut out completely. I used a blob of 3d glue gel behind each petal to maintain the raised effect.
Once you are happy with the petal cutting, cut out around the whole image and mount onto black card-stock, then mount your cut out onto another page of the Floral Soul designer papers.


My second card is a similar design to my first, however the background is Distress ink and then the Floral Grunge flower was stamped over the top with grey dye ink. I cut the sentiment from the bottom of the Be Kind stamp so that it was easier to use separately and stamped it randomly across the background with black dye ink.
The main image was stamped and then coloured with polychromus pencils, before cutting out and mounting onto black card-stock.

Thank you for stopping by and please call back for daily Design Team inspiration.

Julie xx 

Saturday 29 December 2018

Floral abundance! (by Rachel)

Hello there! I hope you have had a wonderful Christmas and are now gearing up to the New year! I have some final makes from November's shows to share with you today....
This first one used the stamp shared beauty and tagtastic plus one of the designer papers. I stamped the image all over the card then coloured in using distress inks. Finally I have added a piece of the designer paper cut out in the shape of the tagtastic stamp.


In this next one I used the movie strip collage stap and stamped onto a ready made background that I had done using brushos. I then used inks to colour the image.This image was then added to another layer of the designer paper and finally onto a card.


My third card was made using a piece of designer paper that I stamped onto. I then added some lolly sticks which I had already sparingly covered in gesso and once dry hadcovered in oxide inks. I then did a bit more stamping and finally added the flower from the movie strip collage stamped image.


In this finally card I stamped directly onto designer papers using first the Be Kind stamp and then some of the grasses from the show. I also added the word stamps to the right hand side of the card.


I hope you have enjoyed seeing what I have done with these stamps and those fabulous papers.

Wishing you a peaceful last few days of 2018 and all the very best for 2019.

Rachel x

Friday 28 December 2018

One idea for two cards (by Magda)


For my last post of December I send you  my best wishes for a Happy New Year 2019 with this floral project.
As you will see, I changed only the colours of the background and the result  is completely different.  I hope you will like both cards.

I used Versafine Onyx Black for stamping all the stamps :
Large Crackle Background    Sketchy Doodle Landscape    Words to Dazzle & Sparkle

I coloured the backgrounds with several layers of Brusho washes.
The pieces of the flowers and the leaves coloured with the same colours of the background are
glued on the mat.


Thank you for passing by today, hugs and happy crafting.
Magda

'Tis the Season to be Steampunk (by Deborah)

Hello everyone, a final post this month from our Guest Design Team member Deborah. She has chosen some steampunk inspiration for you today, and this would make a great masculine card.

Deborah writes:

Hello everyone and welcome to my last piece of 2018, which is something less Christmassy. Well I thought you'd probably appreciate a bit of a break from all the Christmas cards, even though it's presented in a Christmas style. Well it is still the season after all.

So for this card I went steampunk, which believe it or not is one of my favourite styles even if I haven't used it much lately. The stamps I used are from Steampunkery which is a fabulous set. I used a mix of inks for the card on top of which I added a burlap topper. I stamped the hat image onto white card which is then mounted onto burlap. For the cogs, I used the beetle stamp from which I cut the cogs, layered the up and stuck them on. All the images were painted with watercolours, and there you have it!


So for this card I went steam punk, which believe it or not is one of my favourite styles even if I haven’t used it much lately. The stamps I used are from Steampunky  which is a fabulous set. I used a mix of inks for the card on top of which I added a burlap topper. I stamped the hat image onto white card which is then mounted onto the burlap. For the cogs, I used the beetle stamp from which  I cut the cogs,  layered them up and stuck them on. All the images were painted with watercolours. And there you have it!
 
Wishing each and everyone one of you a fabulous New Year hugs Debs xxx


Thursday 27 December 2018

One idea for two cards (by Magda)

For my last post of December I send you  my best wishes for a Happy New Year 2019 with this floral project.
As you will see, I changed only the colours of the background and the result  is completely different.  I hope you will like both cards.

I used Versafine Onyx Black for stamping all the stamps :
Large Crackle Background    Sketchy Doodle Landscape    Words to Dazzle & Sparkle

I coloured the backgrounds with several layers of Brusho washes.
The pieces of the flowers and the leaves coloured with the same colours of the background are
glued on the mat.


Thank you for passing by today, hugs and happy crafting.
Magda

Wednesday 26 December 2018

movie strip brusho (by Veronica)


 Good morning everyone, I hope that you all had a lovely Christmas Day, with lots of crafting goodies to unwrap - and even better, they're calorie free!
Today I have more brusho samples, this time using the movie strip collage stamp.
The first one I stamped the image using versamark ink and white embossed it. I sprinkled black brusho powder around the image, then used a wet paintbrush to spread the brusho powder - you still get the random effect, but you have a lot more control over where the colour goes.
Once dry, i sprinkled turquoise over the flower head, and used a wet brush again
Tear the edges when it is completely dry, then mount onto black card , then onto a square white card blank.


The second version uses  the same
technique, but this time with black embossed image and grey brusho powder for the background, and a mix of yellow and orange for the flower.
Torn closer to the image this time, then a thin black mat. A strip of the my floral soul  designer papers was added to the left half of a white card blank, and the image added in the centre.

I hope that you all have a very happy New Year in 2019


Tuesday 25 December 2018

The Gift of giving by Lesley

 'The Gift'


So the big day is finally here. And hopefully you are now enjoying all the effort that you have put into it.  You may be sharing it with family, friends, or perhaps there are just you and your partner or maybe even just you.  Which is the hard part at this time of year.  We love sharing our exploits and events with others and we need others to sometimes just be there for when the aventure gets too much and is not as exciting as it should be.

We are very fortunate at CB, we have a brilliant designer in Sue, a fabulous Design Team and we are now blessed with other companies such as Illusionary Artists, Kim Moody and, very recently, Artisan Design wanting us to manufacture their stamps. We are also privileged to do tv shows and retail shows and, this year, we launched our first art retreat with Crafty Individuals.  So we are constantly surrounded by people.

But today, of all days, please take a few minutes to think of those who are not so fortunate. Crafters are, in general, a lovely caring bunch of people. Thoughtful and giving, always willing to lend a hand. So if you know of someone who may just be not a fortunate as the rest of us, and you have a few minutes to spare in the coming days, why not knock on their door, say hello to them in the street, or give someone a call. It won't take much time out of your day, but it could make theirs. It's a gift we can all afford.

May David and I wish you the very best of the festive season and thank you all for being there, and sharing and caring, with us and for us. Merry Christmas!


Monday 24 December 2018

Mosaic Flower Birthday (by Pat)

Hello everyone, today sees the last post this month from our Guest Team member, Pat. She has designed a delicately coloured card using one of our individual flower stamps to inspire you.

Pat writes:

Hi everyone,

I am back with my last card for this month and it features the Mosaic Flower stamp. I started with a background which was made using a couple of different shades of blue Distress Ink spritzed with water on my glass mat, and then the card pressed into it to pick up the colour. I thought they would make a good background for these pretty flowers, which actually remind me of Chinese Lanterns. I stamped andheat embossed them using silver embossing powder and then watercoloured with a waterbrush using yellow with just a touch of orange to shade, and some brown for the stems, all Distress Inks. I also picked out some of the mosaic tiles in several of these colours.

I finished with some blue card as a background and also added a sentiment from the Paisley Elephant set, heat embossed with silver embossing powder onto a piece of the same blue card, and I added craft foam behind it to raise it up a little.


As it is Christmas Day tomorrow I would like to wish you all a very Happy Christmas and a healthy happy and wonderfully creative New Year.

Pat x


Sunday 23 December 2018

Lovely Meadow (by Penny)


Hello peeps, well the big day is nearly here - hope you're more prepared than I am!  Actually it's only a bit more wrapping to do now so that's not too bad.  I hope you can all take a little time to join me for a bit of craftiness though, I'm sharing a bright and cheerful card full of meadow flowers today.  I have used several images from the Wild Meadow set, Versamark ink, white EP, Distress inks and one of the designer papers from the My Floral Soul set.


On a piece of Kraft card I stamped several floral images to create a 'meadow' and embossed them in white.  I coloured them with DIs and edged the focal panel with a white marker pen.  I cut a piece of the designer paper to size and attached it to a white base card.  I then attached the focal panel.


I cut a tag from some spare Kraft card and stamped some more meadow images, then embossed and painted them as before. When they were dry I added some glitter as highlights. I added some lace and attached the tag to the card.  
Thanks for dropping by today, I hope you've enjoyed this little project and I'd like to wish you all a very Merry Christmas and a Happy New Year! 

Xx Penny xX

Saturday 22 December 2018

Wildflowers Through the Seasons (by Judith)

Hello everyone, I have a project to share with you today ustilising the fabulous Tagtastic stamp featured on last month's TV shows on Hochanda. I wanted to show another use for this stamp, and paired it up with the Wild Meadow stamp set for my project.

I started by stamping the image on masking tissue several times, and cutting the image out. I then stamped the image onto my background a couple of times, and then masked the images. I stamped the image again, masking those images, and continued, building up layers of the tag, until I had filled the page. I then added a background colour to fill in the 'blank' areas. I added different colours to the tags, using reverse masking, and then stamped foliage into each tag, while the reverse masks were in place. This meant that the foliage stalks did not overlap the edge of the tags.

I had great fun creating this card, and you could use the idea in a much smaller way for a tag or mixed media project.

I have a bonus project which I created more recently, as I needed to make a Christmas card for my lovely Hubby. I used one of Lesley's beautiful papers, one of the plain designs. I drew a circle in pencil, and added a few snowflakes, which I embossed using white embossing powder. I added a sentiment from the Let's Get Festive stamp set, and built the wreath using foliage from the Wild Meadow stamp set. I added a touch of shading to make the snowflakes really pop.


I will be back later in the month with more ideas to share with you, but would like to take this opportunity to wish you all a very Happy Christmas. I hope that you can enjoy the day, whatever you are doing. Thanks for stopping by,

Judith xx

Friday 21 December 2018

Christmas Tags (by Deborah)

Deborah is sharing her second post this month, and today she has some Christmas tags to inspire you.

Deborah writes:

Hello everyone Debs back again, and this week I have some tags and a little holder for you. Making your own tags for the pressies you give is very satisfying and these little ones really don't take much time.

I made two tags and one holder, mixing and matching the stamps from the Robin the Spruce plate. Using a mix of inks for the background and keeping it simple, this little project took about 45 minutes. You could probably make more in that time with good preparation. One tag, I stamped directly onto the tag and the other I made some homemade washi tape and used that to add interest. The holder I kept clean and simple to add contrast to the tags. I hope I have inspired you for those last minute pressies or that New Year gift.

So as I sign off, I'd like to wish all of you that celebrate, a very merry Christmas and I'll see you all next week, hugs Debs xx

Thursday 20 December 2018

Bright and Beautiful (by Zoe)

Good morning Lovelies, I'm going to use this post to wish you all A Very Merry Christmas, I hope it's a healthy one.

So back to my post, here are some more of my samples created for the Hochanda shows last month.

I used the beautiful backing papers for my first card, I did very little really, just stamped in blue ink and heat embossed the lavender looking plant (sorry I'm not great with flowers) and the butterfly.

I heat embossed onto another backing paper and coloured my flower using pencils, simple matting and layering, and Voila!


My canvas was coloured using spray inks, I stamped the main image onto rice paper and adhered using a mat gel medium. Once dry I stamped around the edges to create some texture, highlighted with white gel pen and added some texture paste through a stencil. I finished off with gilding wax around the edges.

Whiteboard heart from the website which was coloured in layers using Oxides. I coloured the stunning flower with Distress Inks and a waterbrush.


Simple stamping onto linen texture cardstock and coloured using watercolour crayons.


A trio of greyboard tags which I brayered with chalk paints and simple stamping.


I do hope you like my creations, I loved making them.
Have a wonderful Christmas xx Zoe xx

Wednesday 19 December 2018

Butterfly frame by Brenda


Good morning to you all, Brenda here and I hope you are almost prepared for Christmas, only 6 sleeps now!!

My first share this time is a little frame which I stamped with Distress Ink and the lovely Fern from the Wild Meadow set, I used two colours to ink the stamp to give a variegated look and then distress the edges with the same colours. Inside the frame I used one of the Designer papers and stamped a sentiment from Shared beauty and stamped, coloured and cut out three Butterflies from April Fairy and Just Butterflies.


Here I have a tent card using Movie strip collage which I stamped once, masked and stamped a second time, coloured with with pencils and added some Distress Ink around the blooms.


I loved the colour of this particular sheet from the Designer papers and followed the colourway stamping images from Wild Meadow and Floral grunge with Versafine Clair inks. I made the base shape with the Tagtastic stamp stamping three times with Versamark and embossing with detail white, then cutting out the three tag shapes slightly larger to create a black frame. I fixed the thee together with card hinges in the back, fixed the stamped papers, some cord and embellies. I also stamped sentiments from Be Kind and Shared beauty.

This is my last post before Christmas so I would like to wish everyone a peaceful Christmas season.


Tuesday 18 December 2018

Black and White ( By Marga)

Hello everyone here a card from me today


Today I used only black and white. Mostly I'm a colour girl but sometimes you must go out of your comfort zone.
I used black embossing powder for the flowers and stamped the sentiment with Versafine Onyx Black.
The dots I made with a black and white gel pen.

Stamps I used are: Diamante Delights and Birthday words.

Hugs Marga

Monday 17 December 2018

Black Ice Technique (by Pat)

Hello everyone, our Guest Design Team member Pat is back today, sharing a card with an interesting technique for you to try. She has kindly written detailed instructions, so why not give it a go?

Pat writes:

Hi everybody.

This week's card is a masculine make for a change using the Steampunkery set of stamps and with a technique called Black Ice.

I started with the image mat using a piece of gold cardstock. For this technique you need to use a permanent black inkpad which you lightly brush across the surface of the card, angling it to catch the edge with a bit more ink, moving in one direction, then turning the card and doing the same in the opposite direction. It is a good idea to use a piece of repositionable tape or temporary glue on the bottom to hold it steady whilst you do this so that you get nice straight lines of streaks across the surface of the card. I did also brush the ink pad a little more over all of the edges to darken them.

When dry, I stamped the clock image and some of the words also using the black permanent ink. I used a stamp positioner for this as it helps to get a good crisp outline on this shiny surface. Otherwise with a steady hand, press straight down and lift up, holding the card still as you lift is the way to go, plus perhaps talc or something similar brushed onto the surface helps to stop the stamp slipping on contact.

Allow a good amount of drying time before adding some embossing ink, again just brushing the surface very lightly using the weight of the pad to do it, so that the ink does not entirely cover the card, and then heat emboss with clear embossing powder. This gives a nice shiny look but with a slightly uneven finish too, as the embossing powder does not entirely cover the surface.

For the background layer, I used a masculine type embossing folder, and painted the edges with gold mica powder mixed with water using a waterbrush. I then added both layers to my 6" square white card and added a balack sentiment strip and heat embossed the sentiment with gold embossing powder.

I will be back again next week with my last card for this month and I hope you will join me then.

Best Wishes,

Pat x

Sunday 16 December 2018

Floral-tastic (by Julie)

Hello, today I have two cards using the fantastic Floral Grunge stamp


For my first card I stamped the Floral Grunge stamp straight onto the card blank and coloured with Polychromus pencils. The background was created by blending Distress inks with Cut n Dry foam and then over stamping with the little circle eyelet stamp from Tagtastic.
 White paint pen highlights were added as a finishing touch.


My second project is a DL card. I started by stamping the tag design from Tagtastic onto spare card and then over-stamping with Floral Grunge. The flower will over hang the tag, but that doesn't matter as you are going to cut the tag out. Colour the flower with Polychromus pencils and blend Distress ink for the tag background. Finish the tag off by stamping a little square eyelet, cut out the eyelet centre and thread through a piece of card to act as a piece of ribbon. I then stamped the little circle eyelet from Tagtastic onto the DL card blank and then dipped a baby wipe into Distress ink and dabbed onto the background.
The card was finished off by attaching the tag to the card with 3d foam pads.

Thanks for stopping by. Please call back for daily Design Team inspiration.

Julie x

Saturday 15 December 2018

Fifteen MInute Cards

Hello everyone, here we are again with a monthly collection of projects made in fifteen minutes or less. The Design Team have created some time saving projects for your inspiration, ideal for batch making occasions, like Christmas cards, craft fairs, and those occasions when you need to make a card in a hurry. You can adapt lots of these design ideas for different occasions, and change the colours to make them feel more masculine or feminine. Have a crafty afternoon making backgrounds, or rummage through your stash for some patterned papers, and you could be creating some quick cards just like these. So grab a cuppa, sit back and enjoy this month's selection.

Lots of our projects feature Lesley's beautiful designer papers this month, and this first card from myself uses one of the patterned papers from the collection. I have stamped foliage from the Wild Meadow stamp set using a variety of coloured inks, and then stamped the Floral Grunge flower onto the background. I stamped the flower head onto one of the plain papers, and decoupaged it onto the main background. I also added a small butterfly paper pieced from a scrap of the same paper. The sentiment comes from the Be Kind stamp plate.

Rachel has created three very different projects using the papers, and her inspirational ideas are all very quick to make. The first involves creating layers, with matting layers of card in between. You can use just one sheet of the patterned paper this way, making your paper stretch even further.

 A Brusho background was used for her next card, and she has simply stamped the tag image onto one of the patterned papers before cutting it out.

She has used a paper for her background, and covered three circles with more paper, before adding some simple silhouette stamping.


Vronnie has created a beautiful range of cards and matching envelopes. These would be great to give as a gift, or keep yourself. She has used a media plate to create the coloured background, inked and spritzed with water, before stamping the foliage.


A couple of cards from Penny next, her first was created by stamping the image onto smooth card with Versafine and embossing with clear embossing powder. She coloured the image with alcohol markers, used a silver pen to edge the panel, and matted and layered it onto a base card.

She stamped, embossed and coloured the image as before, then edged the panel with a black pen. She stamped the sentiment along the bottom of the base card then attached the focal panel.


A host of floral delights from Brenda next. She has used coloured dye inks for the following cards and stamped in different colour combinations, adding a few gems to complete the cards.


Simple white embossing gives a dramatic feel to the following cards:


She has used one of our edge stamps, using a mix of green and yellow tones and adding splatters of the same colour to the background. She has stamped the Floral Grunge image, and coloured the image with the same tones as the background. A pretty yellow ribbon and black mat complete the card.

A Christmas card from Carole is up next, to give you some last minute ideas if you are still making some cards for friends and family. She used a piece of paper from her stash created with pink and light blue Distress Inks. She stamped the snowflake border over the background in the same colours, top and bottom. She stamped the main image in black, along with the message. She drew a border with a black pen and attached the panel to a square card base. You could add other embellishments if you have time.

Our final projects are from Magda, and are super Christmas projects, but could be adapted for any time of the year.  She has made three quick tags, with Distress Ink backgrounds, smooshing her tags through the ink, which has been spritzed with water, and allowing the background to dry, before stamping the images.

Finally, she has created some tiny tags for her Christmas parcels, using a range of images from our Christmas stamp collection.

We hope that you have enjoyed our projects this month, and we will be back in 2019, with lots more projects to share with you. In the meantime, do keep visiting the Design Team blog for a daily dose of inspiration from our regular Design Team posts. Thanks for stopping by,